Aqueduct Password Requirements

Aquifer has updated our password policy to comply with industry standards and to better protect student data.

Current Password Policy –

  • Passwords must be at least 12 characters long ✅

  • Passwords must contain at least one uppercase alpha character (A-Z) ✅

  • Passwords must contain at least one lowercase alpha character (a-z) ✅

  • Passwords must contain at least one number.  ✅

  • Passwords may not contain part of the username, first name, last name ✅

  • Passwords must be changed at least every 180 days ✅

  • Users may not reuse passwords ✅

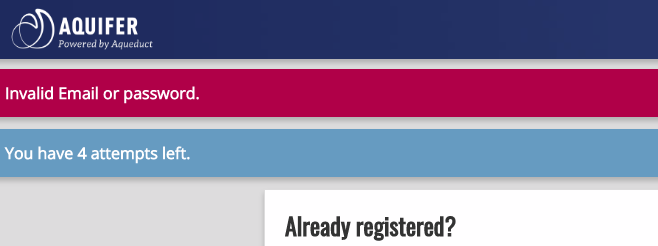
  • Accounts are locked after 5 failed login attempts ✅


Please contact Aquifer Support if you have any questions. A ticket can be submitted using the following form HERE.

Support Ticket

We’re here to help.

If you’ve reviewed our resources and tools and still need tech support, please complete a support ticket here.

If you are experiencing an error (“The change you wanted was rejected“) when registering for the first time and you are using Safari, please try another web browser (Chrome, Firefox, etc.)

Please provide as many details as possible about your issue.

Support Hours:

Aqueduct System Requirements

Aquifer’s teaching and learning platform, Aqueduct, is built using web standards, the program runs on Windows, Mac, Linux, iOS, Android, or any other device with a modern web browser.


Supported Operating Systems include: Windows 10 and newer; Mac OSX 10.14 Mojave and newer; Linux; ChromeOS

Mobile Operating Systems: iOS – please install our app for iOS 13 and newer; Android – Android Oreo, Oatmeal Cookie v8.1 and newer.

Computer Speed and Processor: Best experienced on a computer 5 years old or newer; 1GB of RAM; 2GHz processor

Browsers Supported: Microsoft Edge; Safari 18 and newer (Macintosh only); Chrome 116 and newer; Firefox 120 and newer

New Programs: Whitelist our Domains

This is a critical step if your program is new to using Aquifer. Whitelisting our domains and email addresses will ensure that your faculty and students will be able to gain access to our system.

Whitelisting should be done by your program’s IT department.

Web Traffic

Email from the Aqueduct learning platform

  • Domain:  delivery.meduapp.com
  • IP:  149.72.67.97

How To Change Your Password While Logged In

It is possible to change your password while you are logged into Aqueduct.

Note: Your new password must be 8 characters or longer. You can use a combination of uppercase, lowercase, numbers and symbols.

1. Log into Aqueduct.

Sign into Aqueduct

2. Click on your Profile Icon in the bottom left corner of your screen.

Click Profile Icon

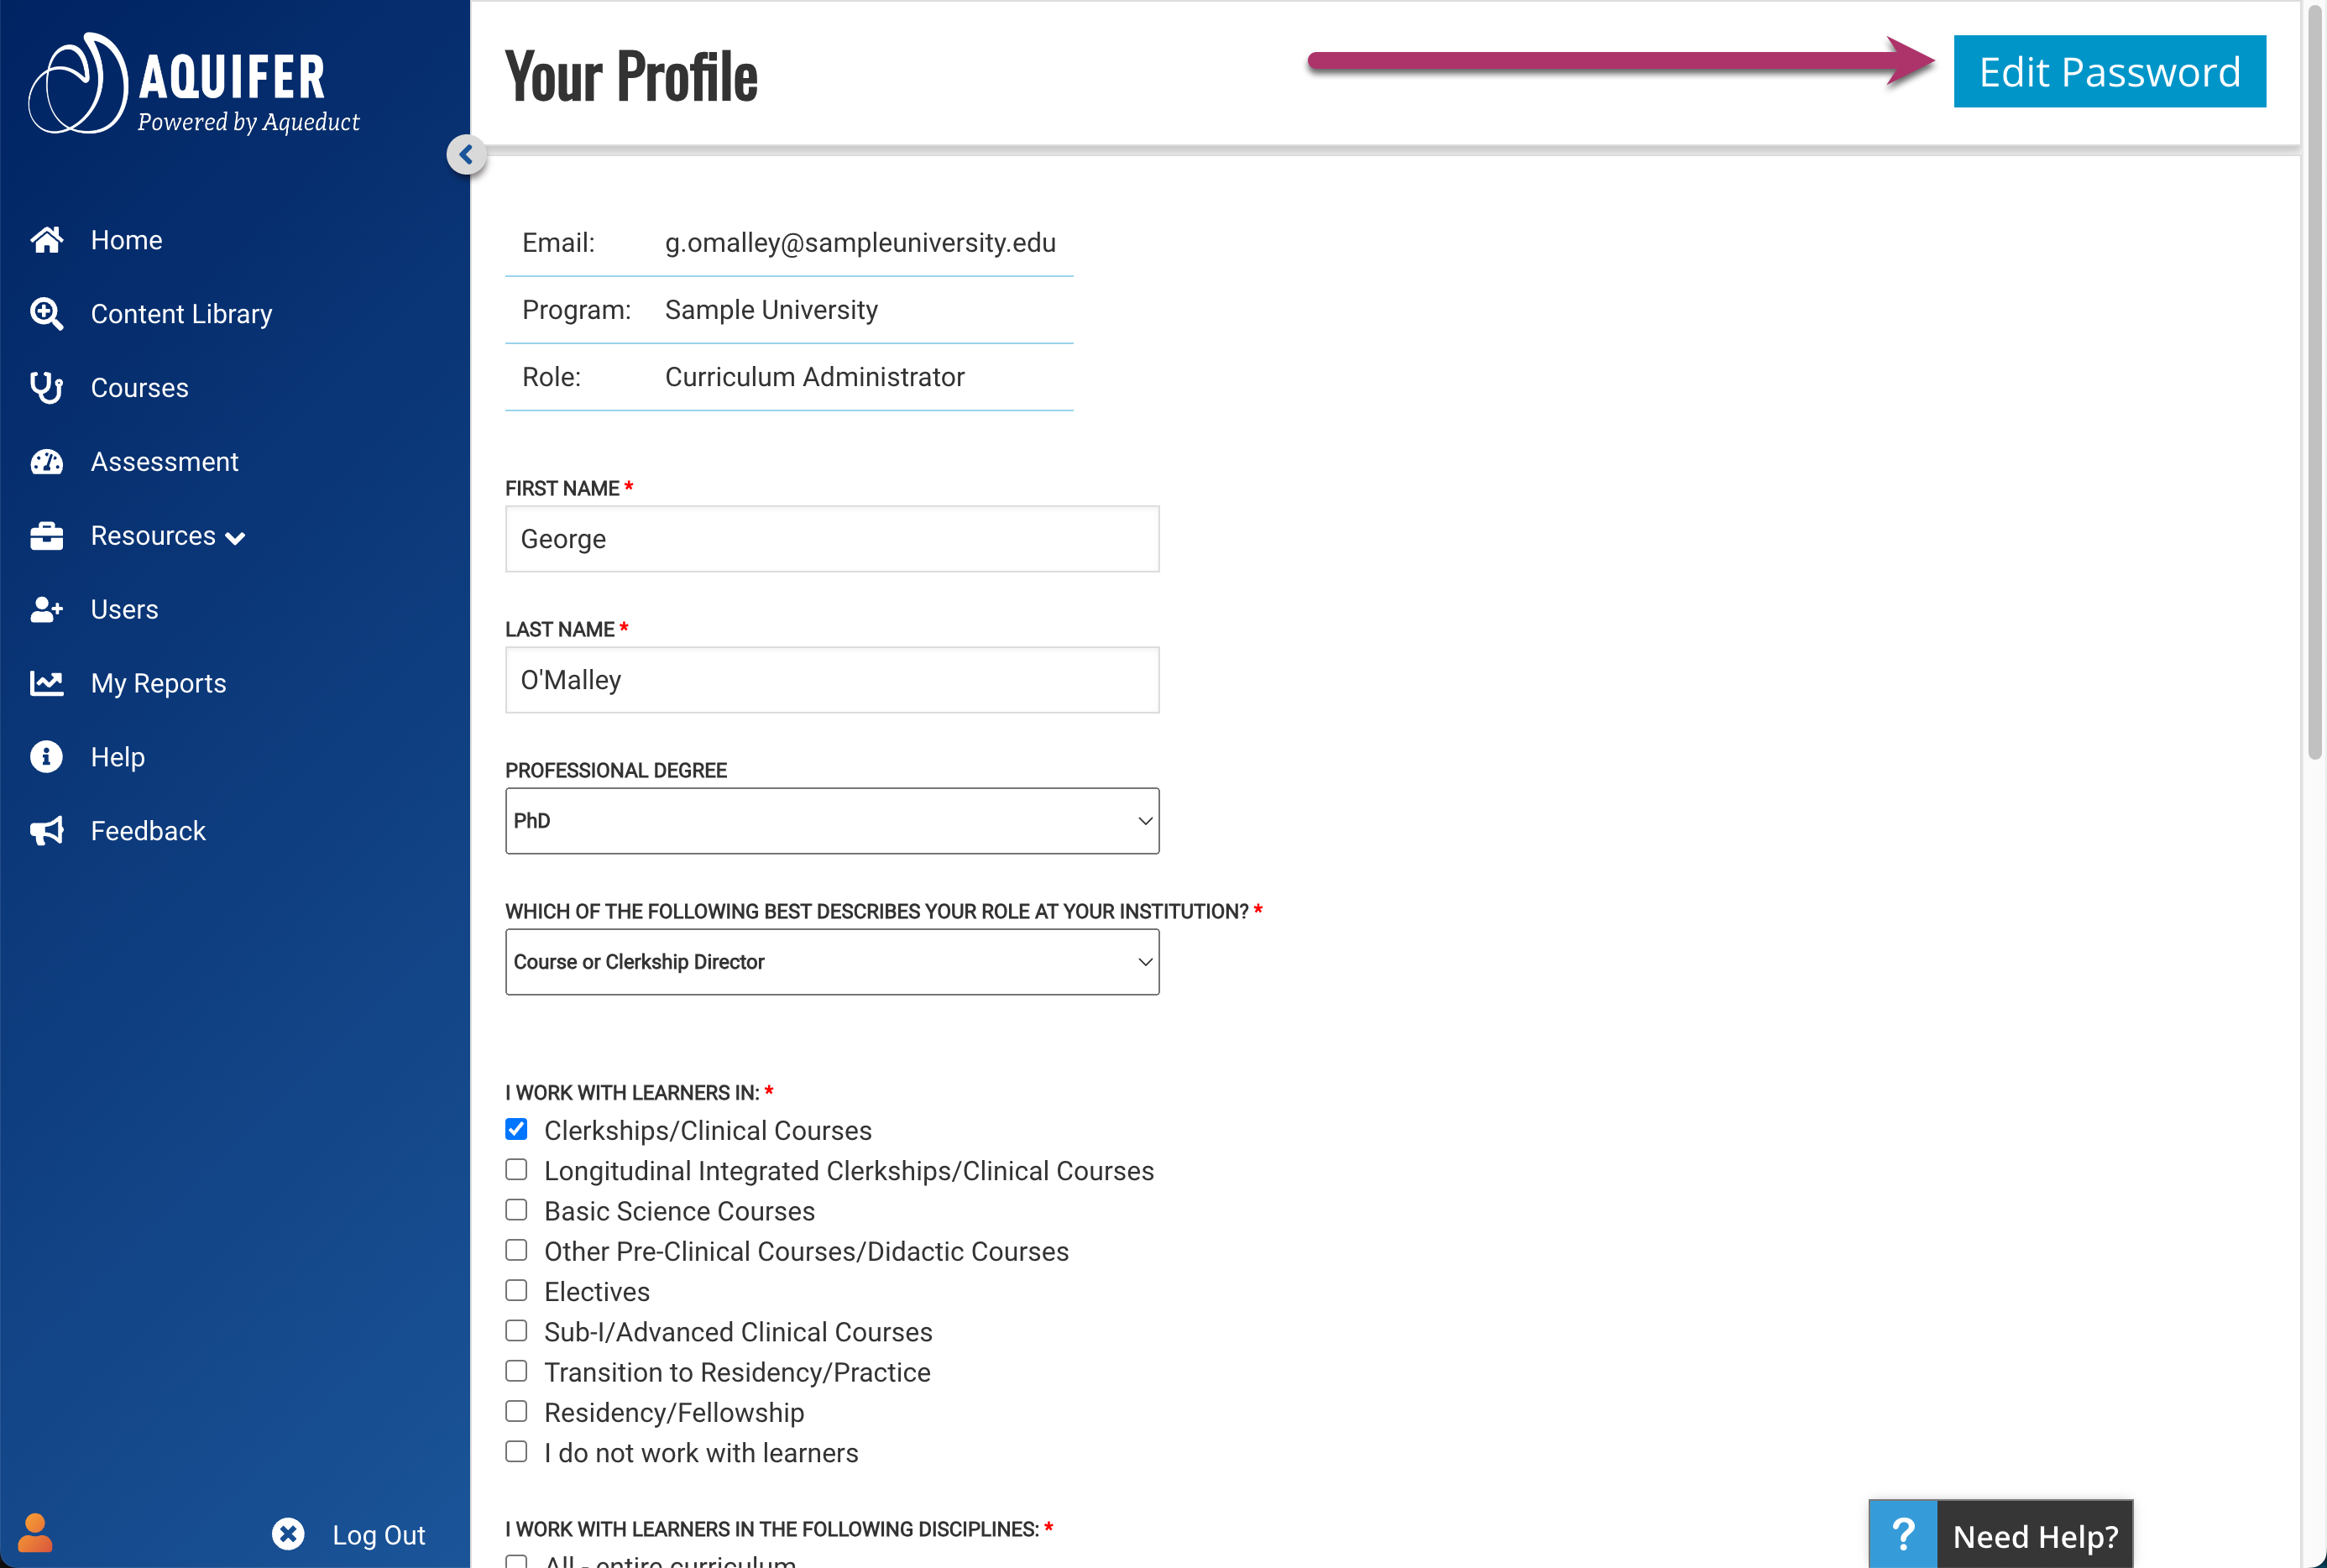
3. You will then be brought to your profile administration page. Click on “Edit Password“.

Edit password

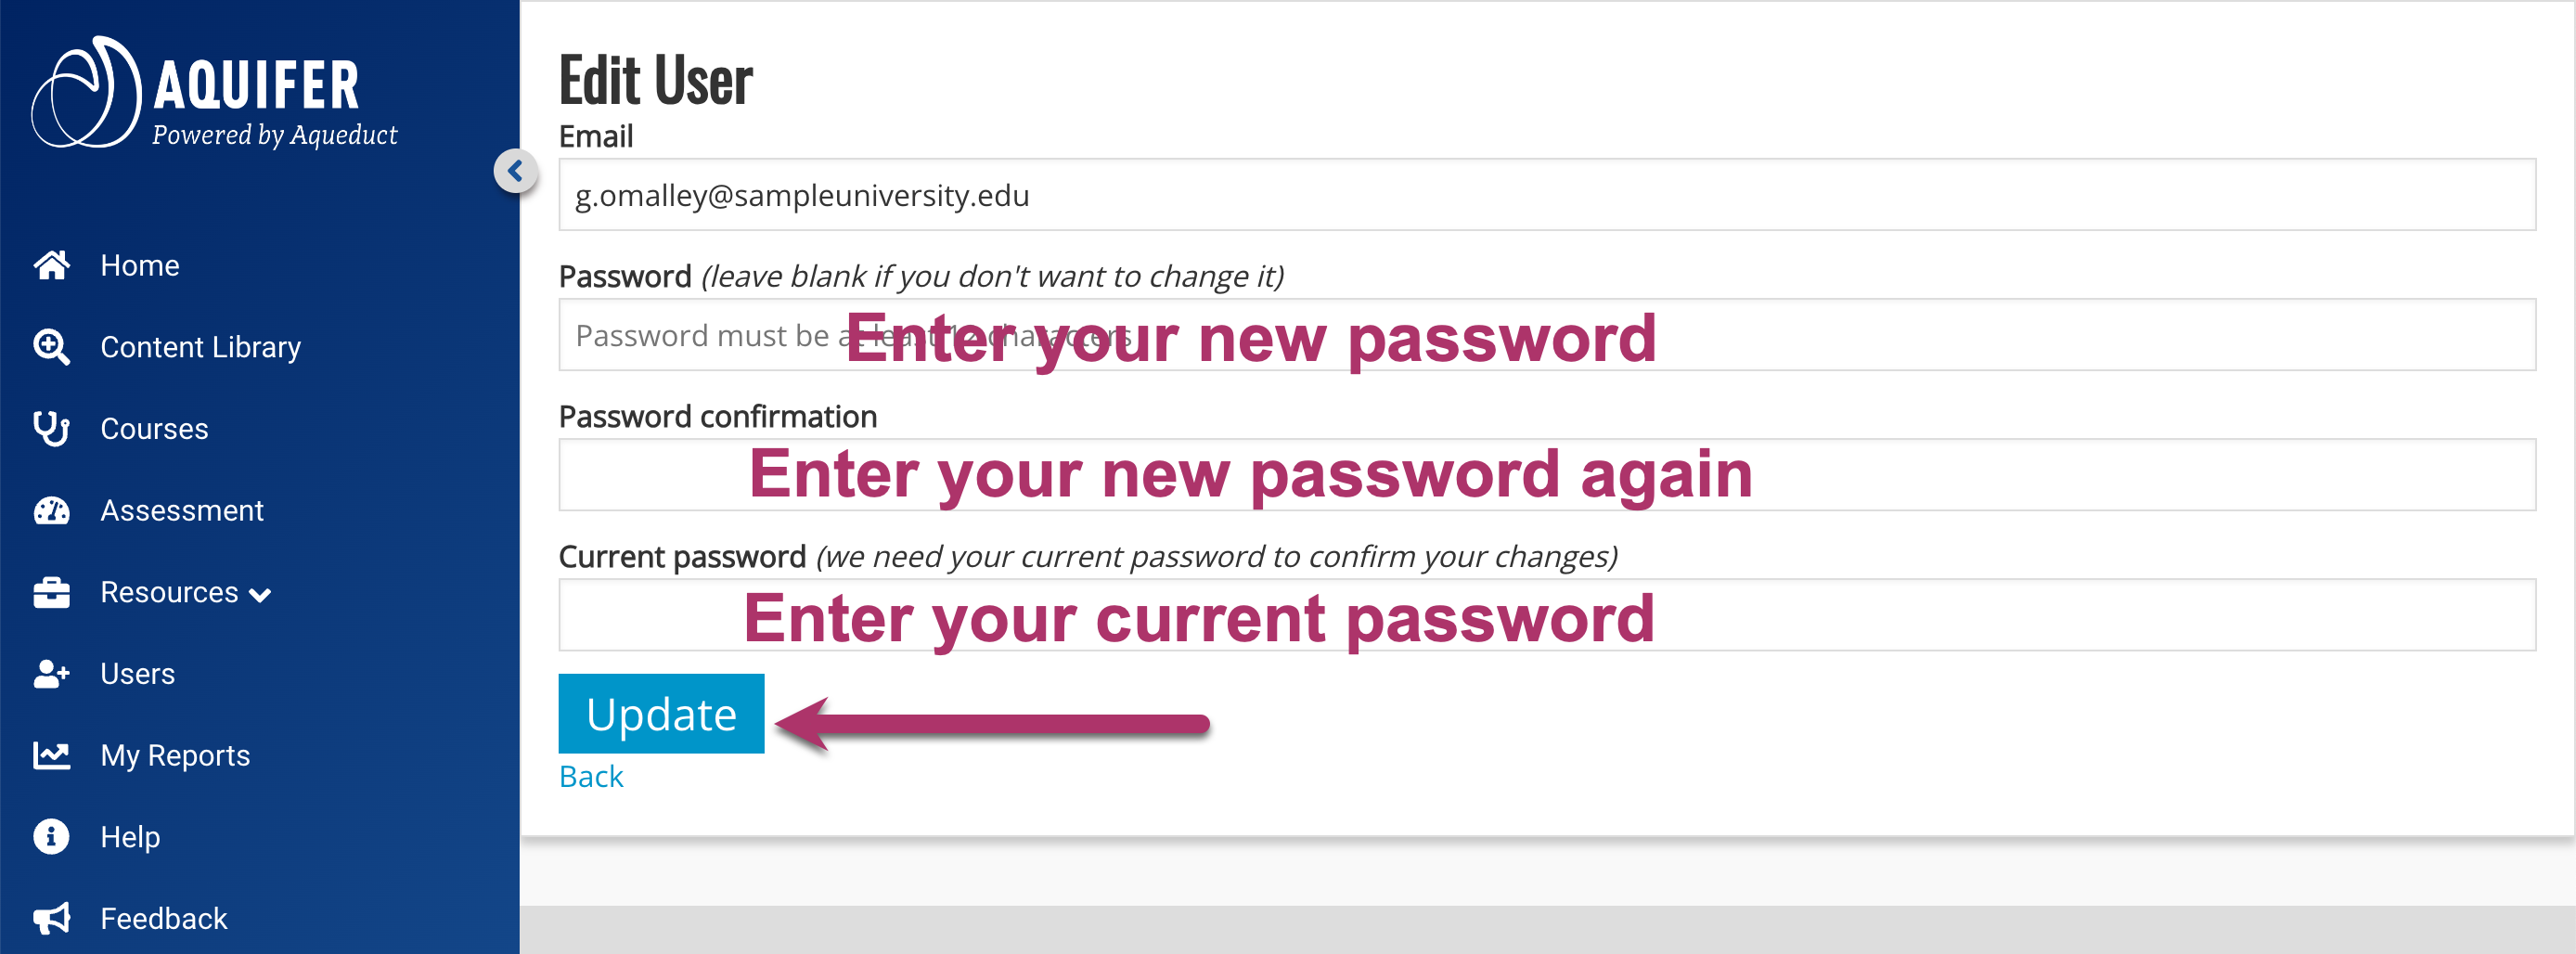
4. You will then be brought to a password update page. Put in your new password under “Password“, put your new password in a second time to confirm under “Password confirmation” and finally put your current password under “Current password“. Now click “Update” to update your password.

Enter new password

5. You will then be notified that you have successfully updated your account (password).


How To Access Another Program If You Are Part Of Multiple Programs


Some users have access to multiple programs in Aqueduct. You can switch between these programs easily to run your administrative duties.

1.Go to Aquifer.org and click Sign In in the top right corner.

Sign into Aqueduct

2. Click on Programs in the left-hand menu. A dropdown will appear, and you can click on the program you wish to access.

Select Program

How To Resolve “Invalid Token” Error

If you are registering for Aqueduct and you receive an “Invalid Token” error when trying to set up a new password, please try copying and pasting the link from your email into Chrome, Firefox, Internet Explorer or Edge. We currently have a bug in Safari that will give an “Invalid Token” error. We are working to get this resolved as soon as possible. If you still are having issues, please submit a ticket using the following link: Aquifer Support


Accessing WISE & CARE Reporting

Quick Reference Guide for WISE & CARE Reporting

Via Aqueduct, Aquifer’s Learning Management System
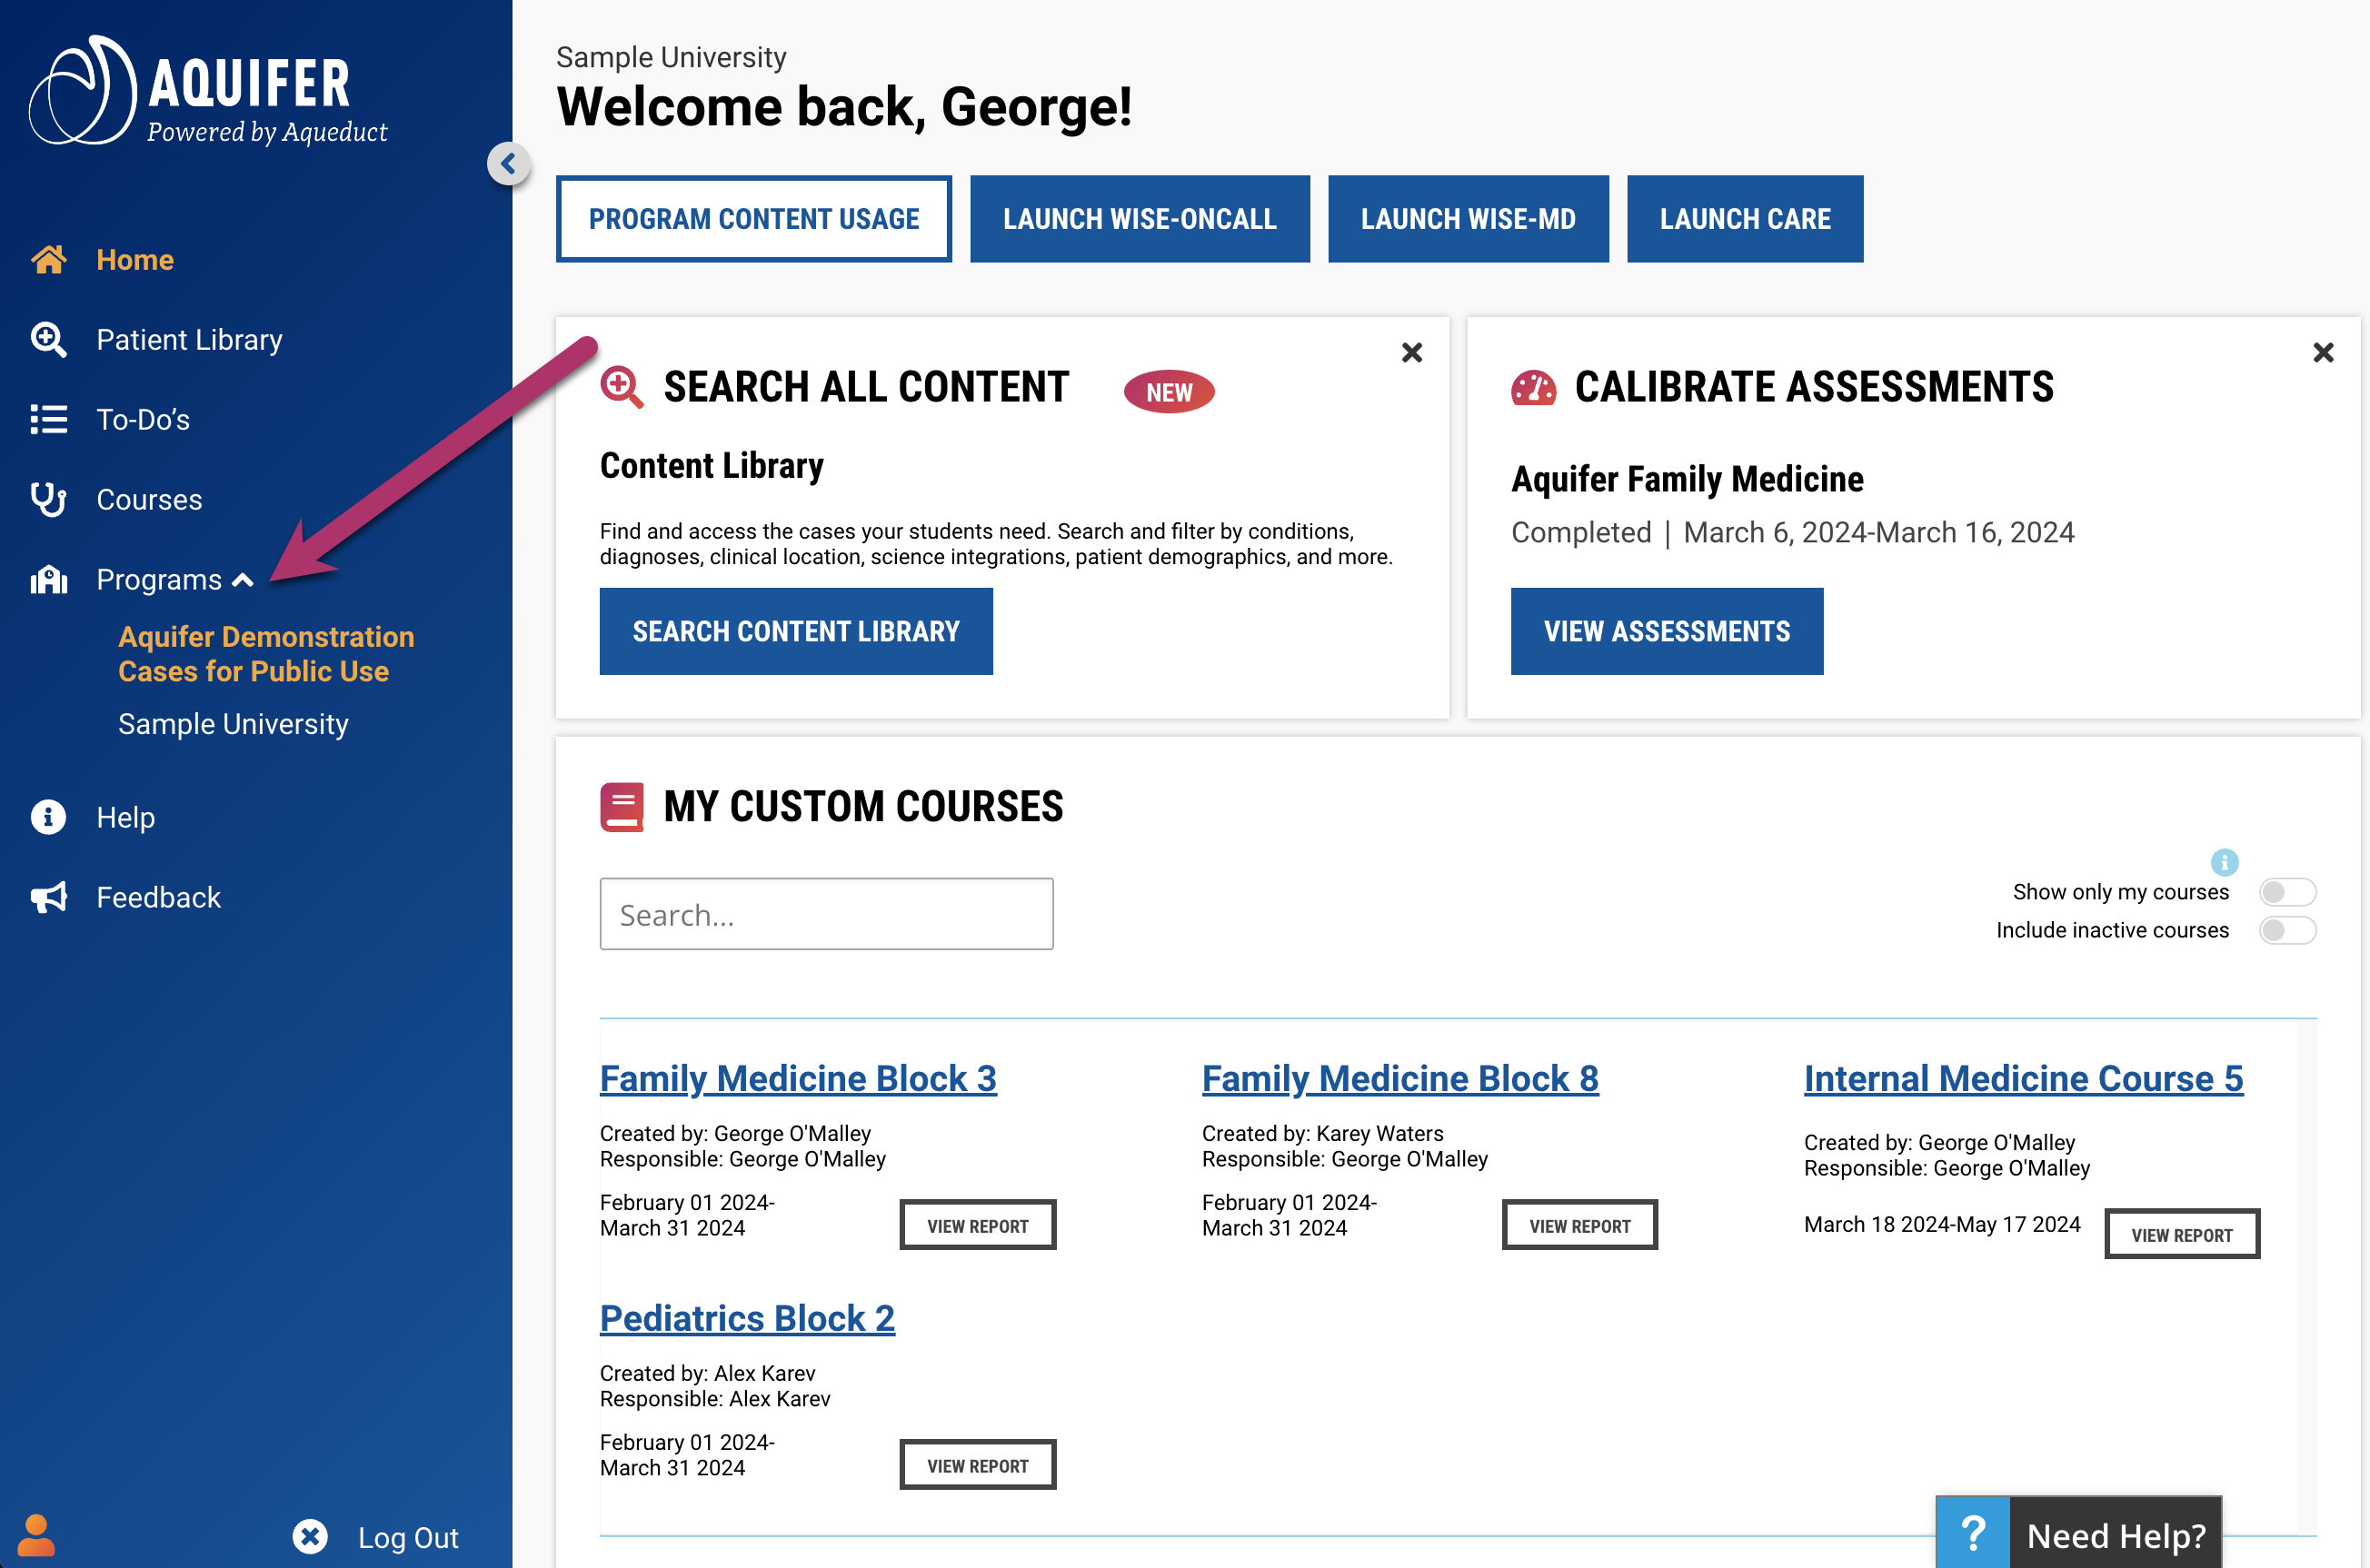
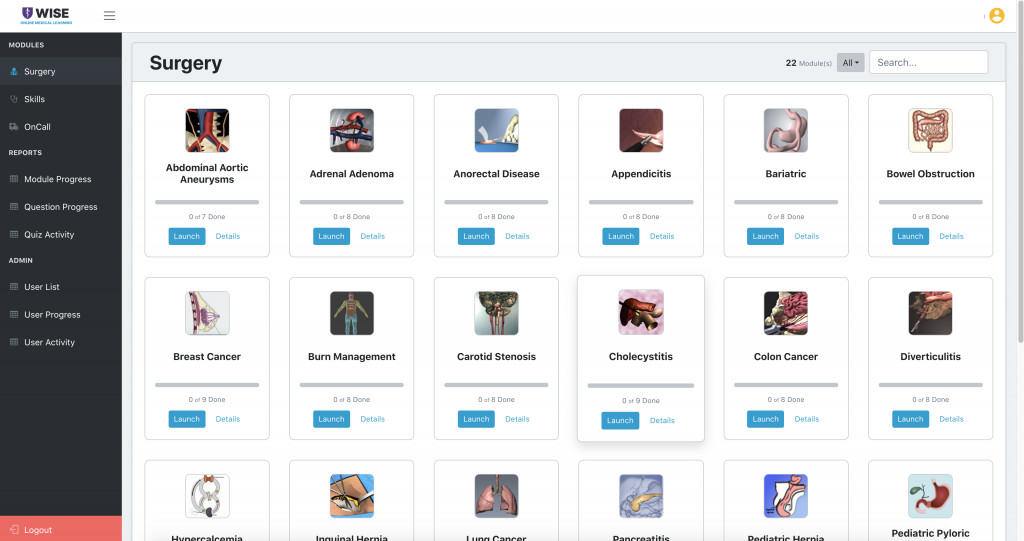
  1. To access WISE-MD, WISE-OnCall, or CARE reports, click on the “Launch (Course Name)” button at the top of the Course page for your program in your Aquifer account.

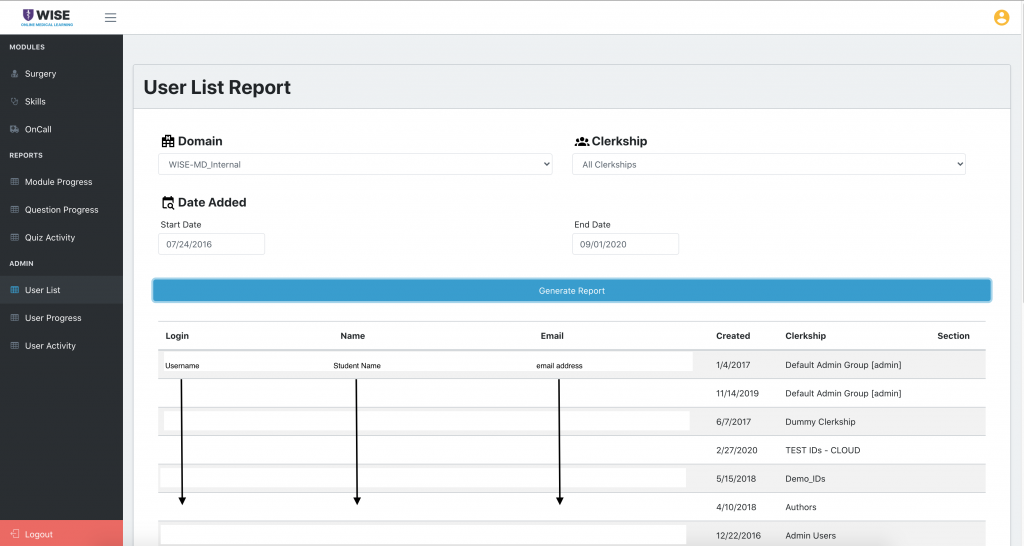
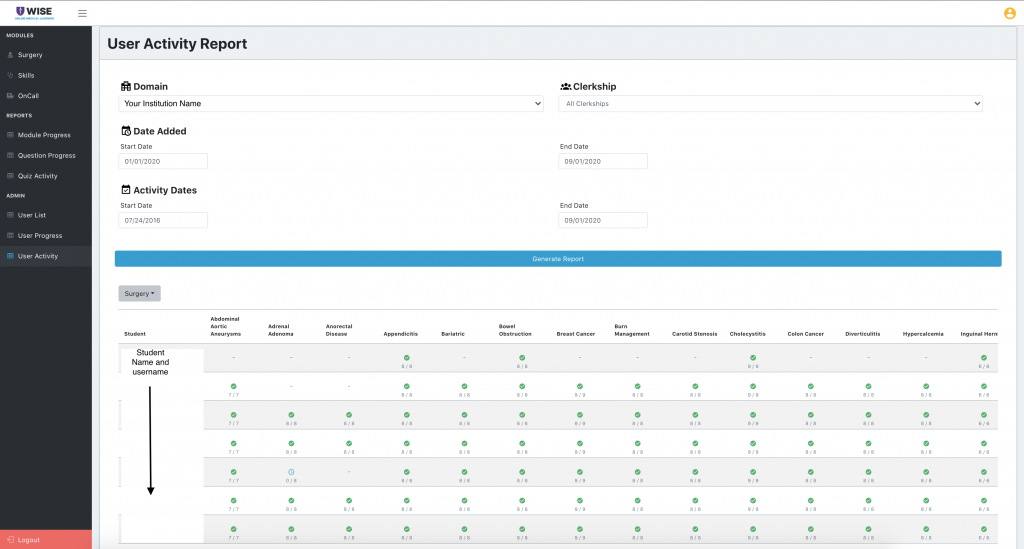
2. The WISE platform will open. All administrative accounts should see the following screen with an Admin navigation tab on the left-hand side. This is where you will be able to access reports. There are 3 report types: User List, User Progress, and User Activity.

Note: WISE-MD = Surgery and Skills; OnCall = WISE-OnCall


Administrators and Educator Reports

For each report type, the following are applicable:

  • Domain: Your institution or program (auto-populated)
  • Clerkship: Grouping of learners specified by the institution or program. These groupings are created on the backend by the WISE team and are useful for reporting. If you are interested in hearing more, please email wise@nyulangone.org.
  • Date Added: The date the user was added to the WISE database. Please note that users are added to the WISE database the first time they click on a WISE product button from Aqueduct. If a learner does not show up in the search, alter this parameter.

User List

This report will give you a list of users based on the date range you specified. The date range is the date the user was added to the database.

User Progress

This report will give you individual learner reports. If you do not specify names, then you will receive a list of all learners added within the date range specified. Click on the Progress button corresponding to the learner you are interested in to get their report.

User Activity

This report will give you group activity reporting based on two date parameters: the date the account was added and the date of activity. This report displays multiple learners at once. If you use more than one course (Surgery, OnCall, or CARE) then you are able to filter by course. The green check icon means the module is completed; the clock icon means the module is in progress.

Please note: Questions and practice cases are for learner self-assessment only and are not designed to be used for grading purposes other than completion, (i.e. you completed the questions, you get a Pass). There are no reports showing question results available to faculty/administrative staff. Learners are able to attempt the questions and practice cases as many times as they like.


Learner Reports

All questions and practice cases are meant to guide learning and the learners are able to redo the questions as many times as they need to determine the correct answer. The learner receives immediate feedback on the question (whether it is correct or incorrect) along with explanations. There are 3 types of learner facing reports available to the learner: Module Progress, Question Progress, and Quiz Activity.

Module Progress

This report displays the completion status for each module by section. If the learner is enrolled in more than one course on the WISE platform, they will be able to filter based on which course they need (Surgery/Skills, OnCall or CARE).

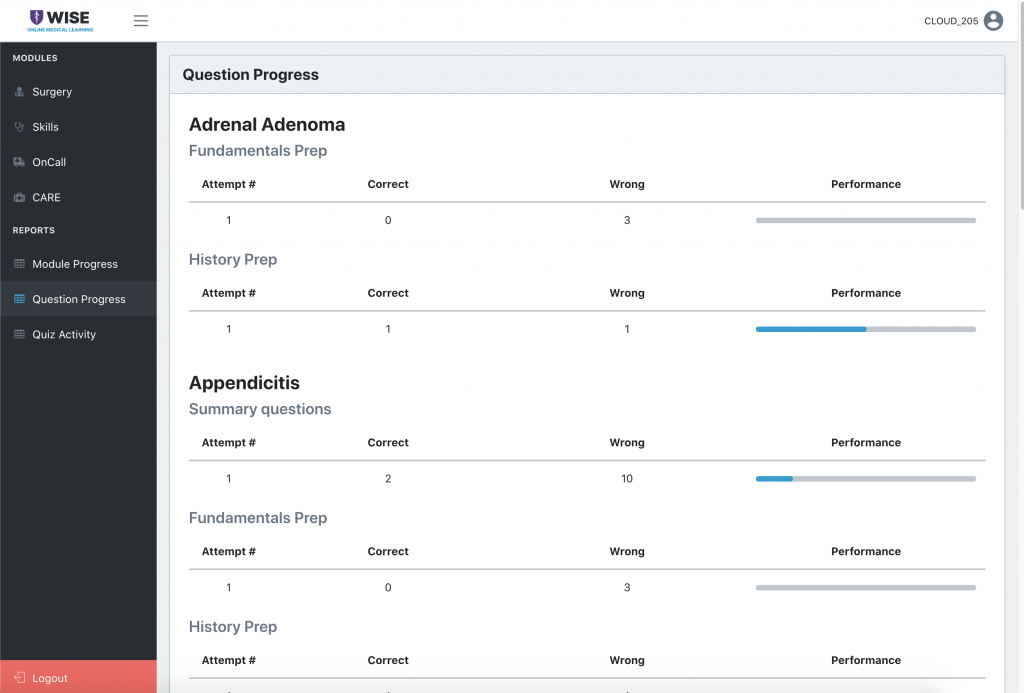
Question Progress

This report details the learner’s question performance by each attempt for each section of each module.

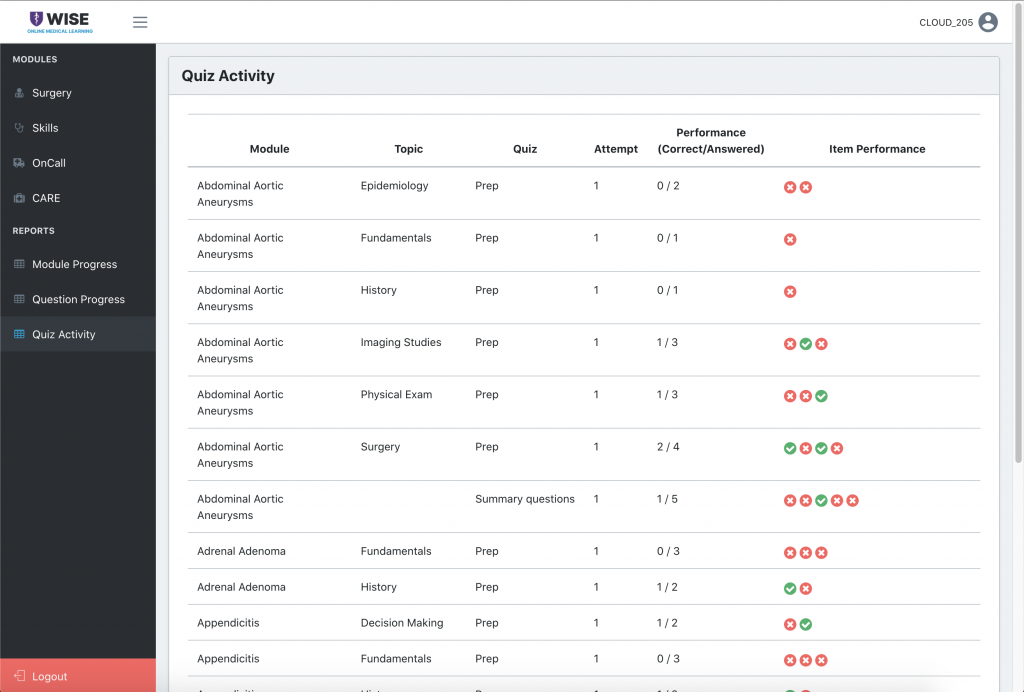
Quiz Activity

A graphical report of the learner’s question performance for each question, grouped by module and then section. 

***Faculty interested in noting completion of these questions can ask the learners to screenshot the learner facing reports and that image/file can be uploaded ***

Resetting Student Cases


As of January 2, 2019, students may reset their own cases at any time to review Aquifer cases again in a rigorous way. Please note that individual programs or courses may have specific policies on this function. Administrators can no longer reset student cases.

A Case Reset means that:

  • All progress in the case will be cleared and reset. Previous data will not be available.
  • Students will need to re-take the case to record a completion.
  • Faculty and administrators can view each case reset in their reports.
  • On Student Reports, a black outline will show around the circles indicating progress on the cases that have been reset.

Why Reset a Case?

A student may wish to reset a case to complete it again in a complete way, revealing information step-by-step as they move through the case and answering embedded assessment questions. Although the case content is available to students after case completion, the information will appear all at once (ungated) and questions will show previous answers. Resetting the case will remove all previous data, allowing students to repeat the original case experience.

Download Case Notes

Before resetting a case, be sure to download any notes that you’ve saved in Aqueduct. There are two ways to do this:

  • To download case notes ONLY in a csv file, select cases below and click the Download Case Notes button on the Case Reset page.
  • To download Case Summaries with your notes included, return to the end of the case(s) and click Download Case Summary.

How to Reset a Case

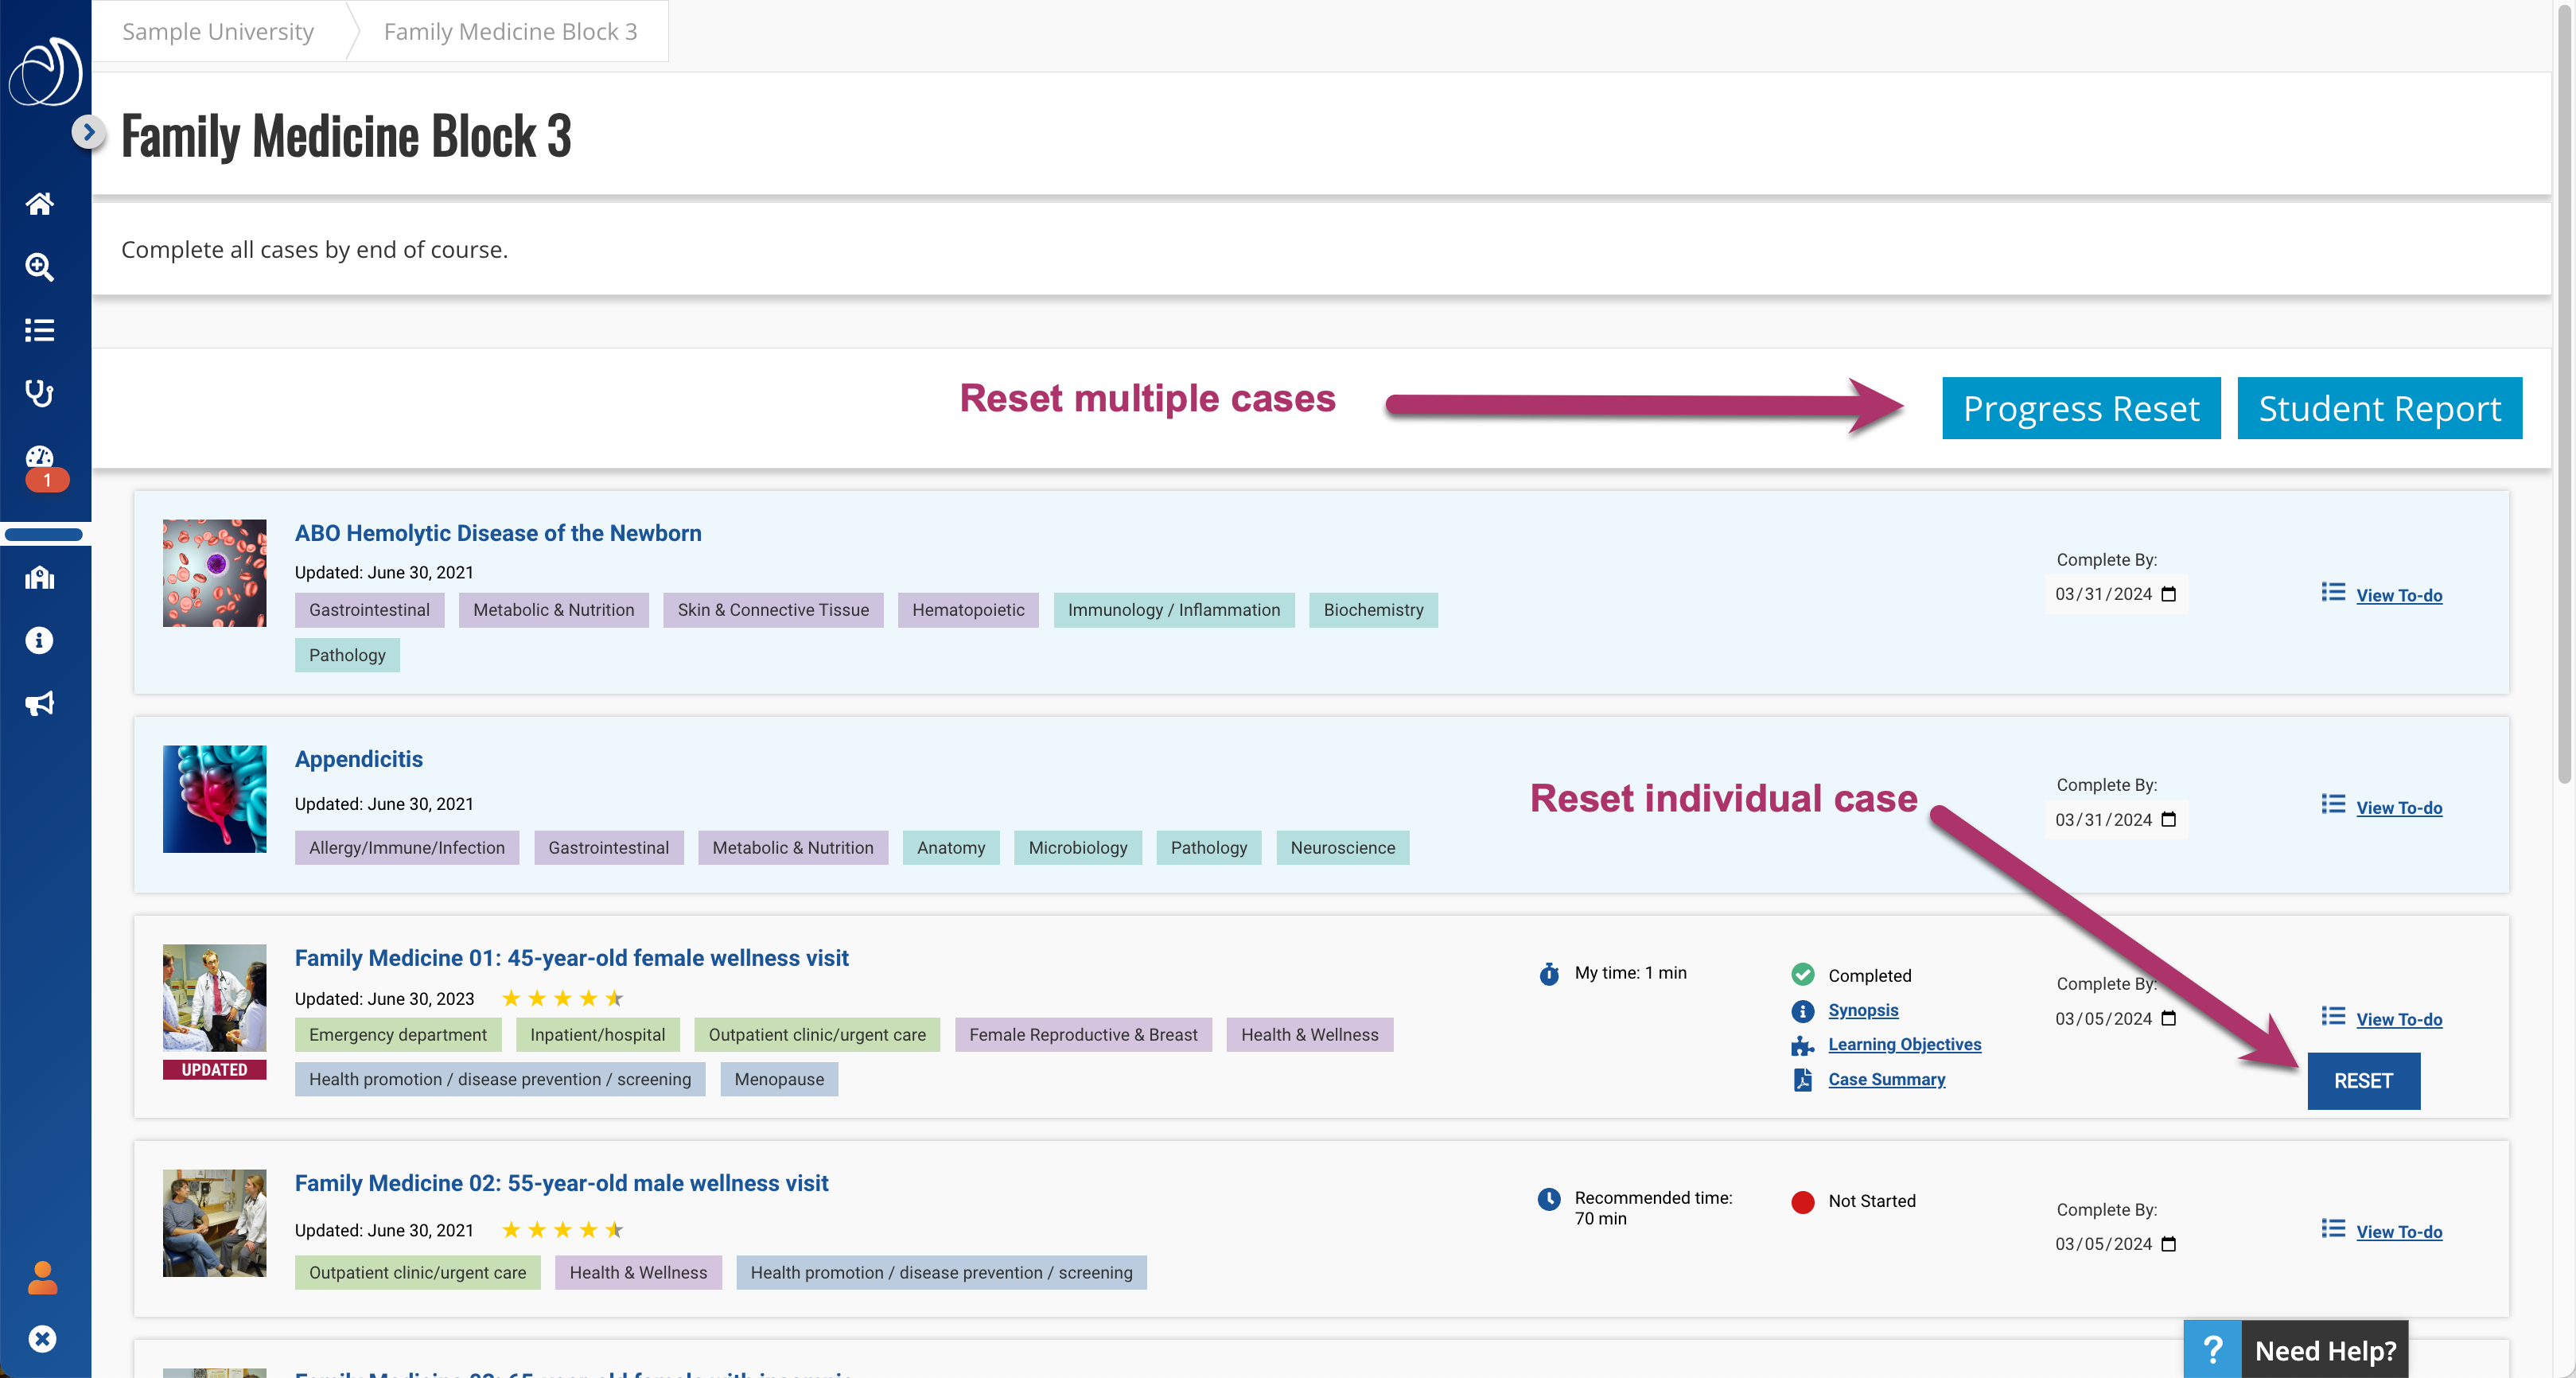
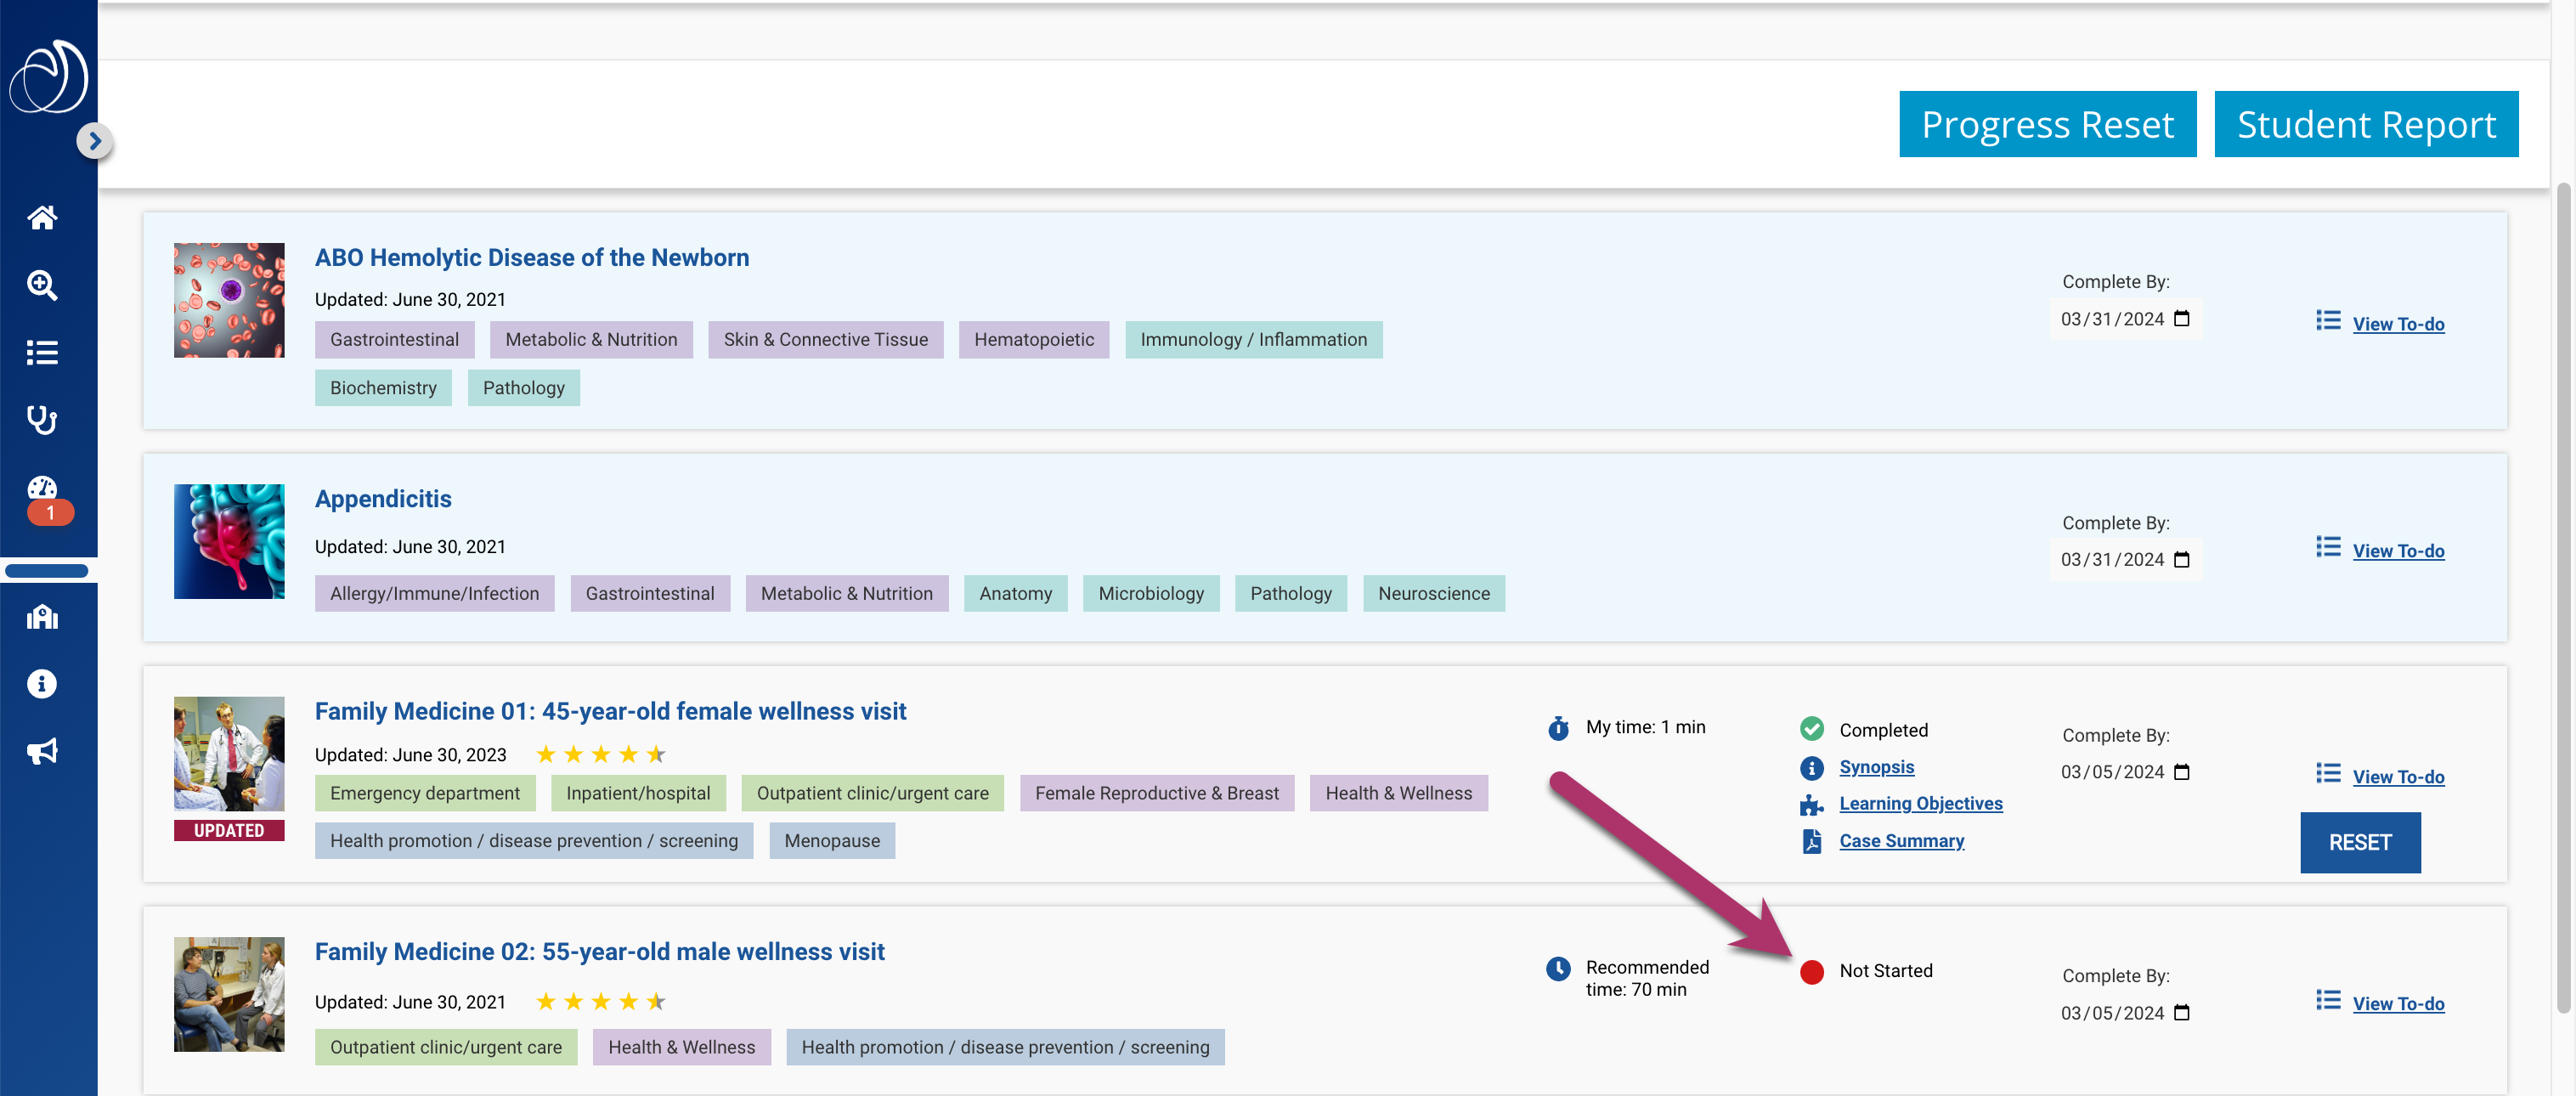
1. To reset an individual case, from the course page, simply click the “Reset” button on the case you wish to reset.

  • If you want to download the Case Summaries with your notes included from your completed cases, return to each case and download the case summary at the end of your case.

2. To reset multiple cases, click the “Progress Reset” Button in the top right hand corner of the course page.

Reset Cases Updated

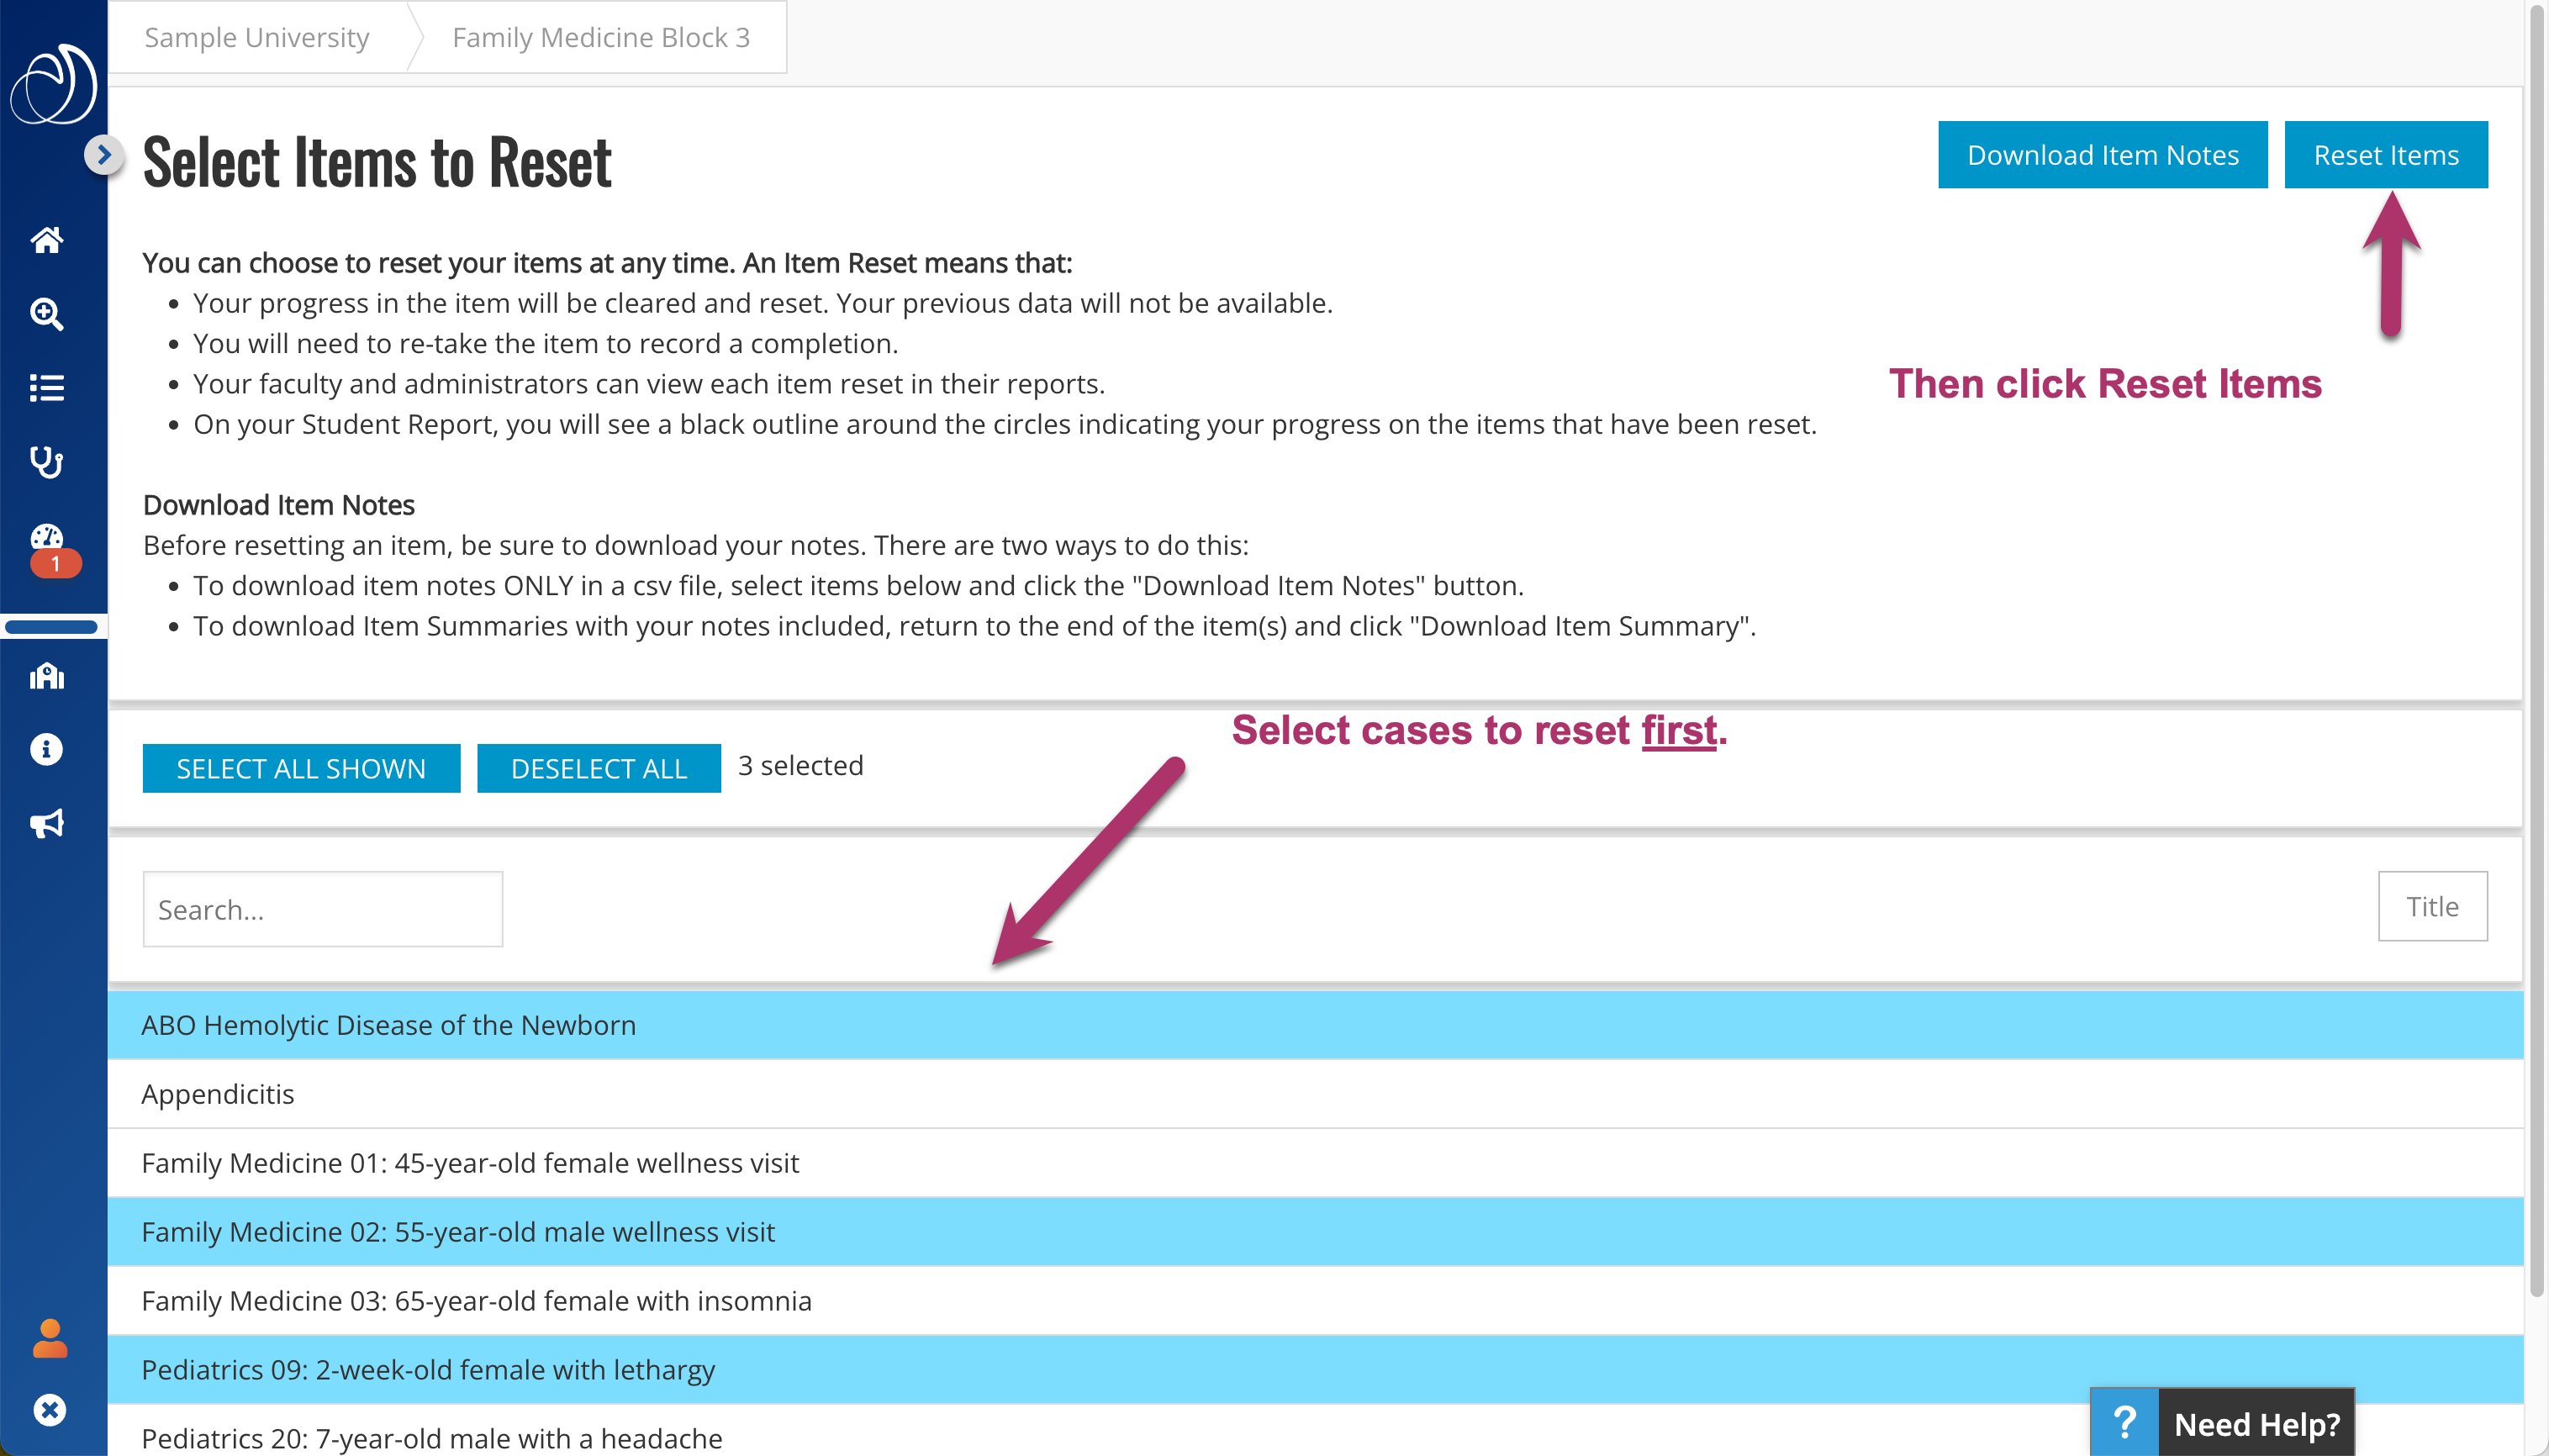
3. Select the case(s) that you wish to reset. Selected cases will show in blue. You may also use the search field for Select All or Deselect All to quickly choose your cases. Note: If you need to download your case notes, click the Download Case Notes button.

Select and reset items

4. Click on the Reset Cases button. Two warnings will come up to ensure that you wish to continue and that you have downloaded your notes. Click OK twice to reset your cases.

Student Confirm Case Reset
Student Case Reset Final Warning

5. After resetting, you will land on the course page where you will see that the progress bar for your reset cases has been updated to show 0%.

Case Reset

Exam Support Contact

Aquifer Support Hours:

Monday – Friday 8:00 am – 5:00 pm Eastern Daylight Time
We will get back to you within 24 hours.

Except for the following holidays.

Program Level Reports


Program Course Usage Report

The Program Course Usage report is designed to provide a high-level view into total usage of Aquifer courses by your program during a given period of time.

To access the Program Course Usage report:

1.Select Programs from the top menu navigation.

2.This will take you to Your Programs. Click the Program Course Usage button.

3.Select a date range, if desired, and click Use Date Range to refresh the report. Click on the program name (or +) to reveal the report. Note that if you’re enrolled in multiple programs, you’ll see all of your programs listed here. Select the one you wish to view.

The Program Course Usage Report includes a list of courses your program has access to, including both standard Aquifer courses (highlighted in grey) and custom courses created by your program (not highlighted). For each course, the following data is shown:

  • Number of cases in the course
  • Number of cases started
  • Number of cases completed by users in your program during the date range you selected
  • Name of the person assigned to be responsible for Custom Courses (created after July 2018)

Program Case Usage Report

The Program Case Usage report is designed to provide a high-level view into total usage of individual cases within Aquifer courses by your program during a given period of time.

To access the Program Case Usage report:

1.Select Courses from the top menu navigation.

2.This will take you to a list of your Courses. Click the Program Case Usage button.

3.You’ll see a list of your courses displayed. Click on the course name (or +) to reveal the report of an individual course. You can reveal more than one course at a time. Select a date range, if desired, and click Use Date Range to refresh the report.

For each of your courses, the Program Case Usage Report includes:

  • A case list
  • Number of cases started
  • Cases completed
  • Average time (in minutes) it has taken students to complete each case. You may hover over the ‘i’ icon on each of the columns to get a definition of the measurement.

Exam Technical Support Information

Technical Requirements

Aquifer’s exam platform is built using web standards, the program runs on Windows, Mac, Linux, or any other device with a modern web browser.   We recommend using a desktop computer or laptop, the screen on a mobile device would be too small.

  • Windows 7, Windows 8, Windows 10, Windows 11
  • Mac OS X version v11 thru v14 (Sonoma)
  • 1GHz processor or higher
  • 17” screen or larger monitor (Desktops)
  • 13” screen or larger (Laptops)
  • Broadband (DSL, Cable or T1)
  • 256Kbps or higher per workstation

Students using personal laptops should be advised to arrive early to detect any problems with their local firewall.

Extra workstations/laptops should be available to replace computers that may malfunction during the test session. These spares should be enabled for wired and wireless LAN use.

* Adapted from the NBME Quick Start Guide to Web-Based Exam


Technical Support Staff Responsibilities

Individuals serving as technical support for an exam are expected to ensure that all computers being used for exam administration can deliver the exam securely and successfully.

In advance of administering the exam, we recommend…
  • Set up a dedicated workstation/laptop in each testing room that will used by the proctor in that room.
  • If you would like to run a sample test to verify the secure browser has downloaded and is working successfully, please contact exams@aquifer.org to request a test login for your institution.
It is the responsibility of the technical support staff to…
  • Have knowledge of the operating system (OS), virus checker and browser version that reside on institutional workstations/laptops or examinee laptops.
  • Be knowledgeable about the network architecture of the testing rooms.
  • Verify that Internet connection speed is adequate (minimum T1) for the exam.
  • Be available to be onsite on the day of the exam to resolve technical problems that may arise.

Exam Support

If an issue arises during the exam:

    1. Contact your institution’s technical support staff.
    2. Access Aquifer Exam Troubleshooting Tips.
    3. If neither of those addresses the issue, contact Aquifer’s exam support staff weekdays 8 am – 5 pm ET, except federal holidays.

Contact exams@aquifer.org or (603) 727-7002 ext. 2 with any questions about test administration activities.


Security Reminder

Please remind all faculty and students that all exam content is confidential and should not be shared with anyone, at any time, in any way.

Create a CDME Exam Roster


In Aqueduct, Custom Course Manager and Lead Course Administrator users are responsible for exam standards, utilization, and identifying learners who will require access to scheduled assessments.

If you’re a Custom Course Manager or Lead Course Administrator, please follow the instructions below to create a CDME exam roster, which can then be downloaded and forwarded to Aquifer’s exam management team. You will find resources for successful exam management here.

Please note that a Custom Course is required in order to utilize Aquifer Exams. Learn how to set up a Custom Course.


How to Create an Exam Roster

  1. FROM WITHIN YOUR CUSTOM COURSE: Choose the More Actions button on the top right-hand side.
  2. From the Course Management page, use the right-hand column to select those users who will need to be rostered into the CDME.
  3. Please verify that your list is correct before moving onto the next step – Review the list of student emails. Please ensure that no student is listed as UNKNOWN UNKNOWN. If they are, please contact those students directly and have them complete their registration. Students not registered are ineligible for CDMEs until they have completed their registration.
  4. When all students are correct, Choose Exam Roster button in the top right-hand corner.
  5. An Excel CSV file with a roster of these students will be downloaded onto your computer.
  6. Attach the downloaded file to your Exam Request Form.
  7. You can expect to receive a confirmation email that the roster has been received and is being processed.
  8. Approximately one week in advance of your exam date, you should expect to receive an exam guide from exams@aquifer.org
  9. If you have any questions or concerns, please direct all inquiries to exams@aquifer.org or call the exam helpline at (603) 727-7002 ext. 2.

Exam Troubleshooting

For Aquifer Pediatrics – Aquifer Family Medicine – Aquifer Radiology Exams

Student results are sent to the clerkship within two business days. Aquifer does not share results directly with students.

Often students will attempt to log back into the exam platform after their administration is over. If a student is “stuck” at the login page, they will need to perform a hard reset of their device in order to return their device to off the Secure Browser. They can be instructed to do a hard reset, or they can be referred to call the helpline.

Aquifer sends two reports with students results from their exams. One is the Administrator’s report, and the other is the Student’s report. For those institutions that desire to give individual reports to students there are a few ways to do so:

  1. Print the entire document and disseminate individual paper hard copies to students directly.
  2. Create individual PDF’s for each student: Open the document and hit the “print” icon, select # of the pages (the student report is 2 pages per student, so 1-2, 3-4, 5-6, etc), click the PDF button at the lower left, save as PDF, and change the name of the PDF(to the student’s name) and save it in the correct location on your computer. When you have done this you will have an individual PDF for each student, and can send them as an email attachment to students directly.

Additional Support

For further assistance, please call the Helpline weekdays Mon-Fri 8am to 5pm Eastern Standard Time, except on federal holidays at (603) 727-7002 x2 or email at exams@aquifer.org. If you receive a voicemail, please leave a name and number, someone will return your call as soon as possible. 

Resetting Your Password

Current Password Policy –

  • Passwords must be at least 12 characters long ✅

  • Passwords must contain at least one uppercase alpha character (A-Z) ✅

  • Passwords must contain at least one lowercase alpha character (a-z) ✅

  • Passwords must contain at least one number.  ✅

  • Passwords may not contain part of the username, first name, last name ✅

  • Passwords must be changed at least every 180 days ✅

  • Users may not reuse passwords ✅

  • Accounts are locked after 5 failed login attempts ✅


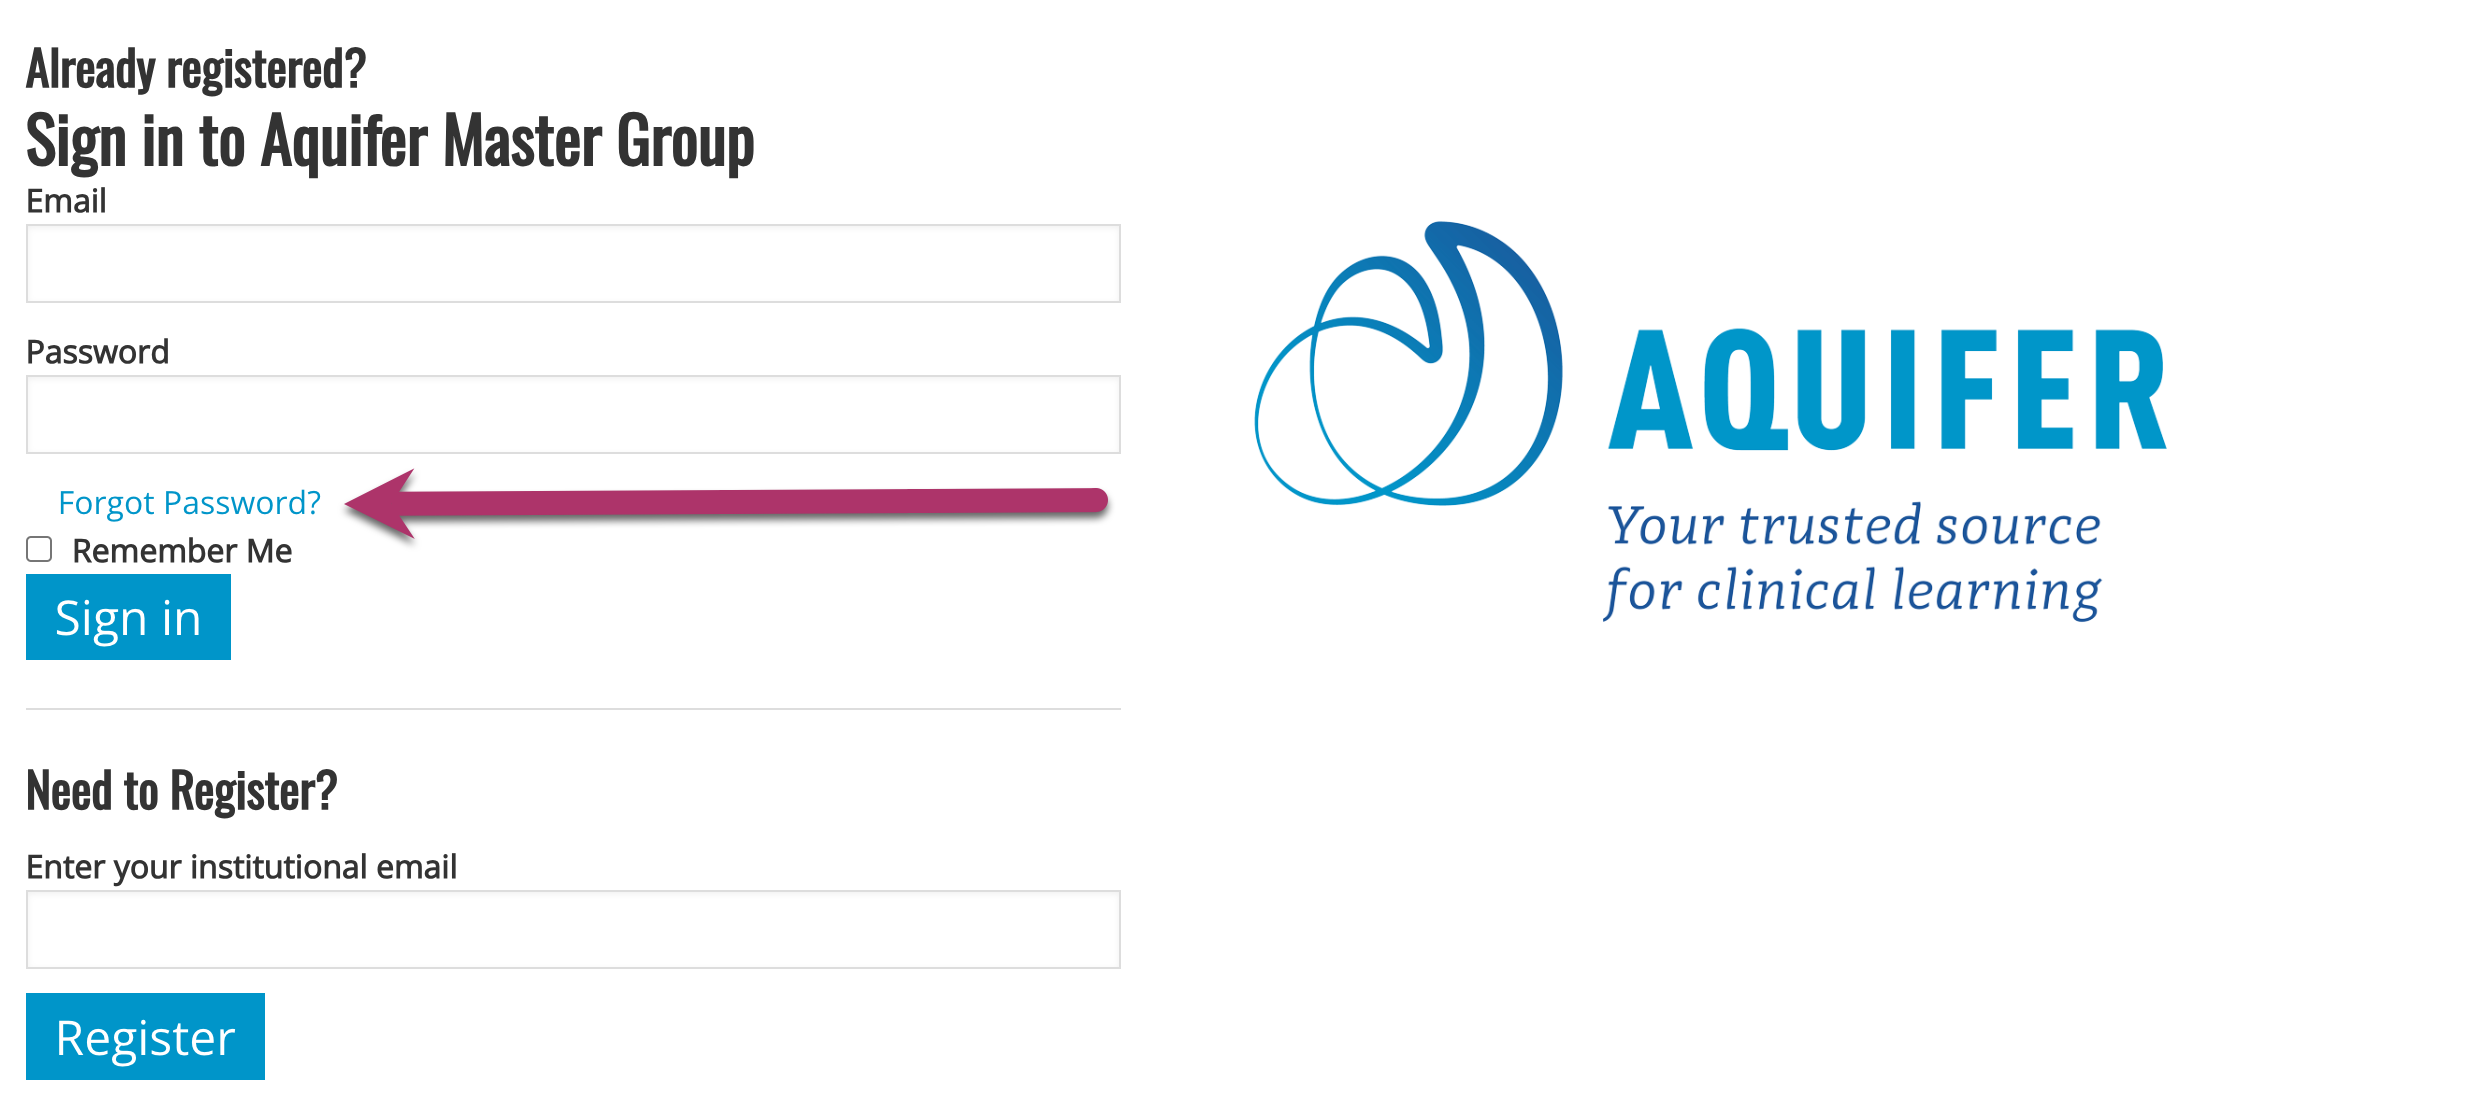
1. If you forget your password, Aquifer can help you regain access to your courses and information right away. From the Sign In page, click the Forgot Password link.


2. You will be brought to a page where you can enter your Account email address. After entering your email address, click “Send me instructions to set my password“.


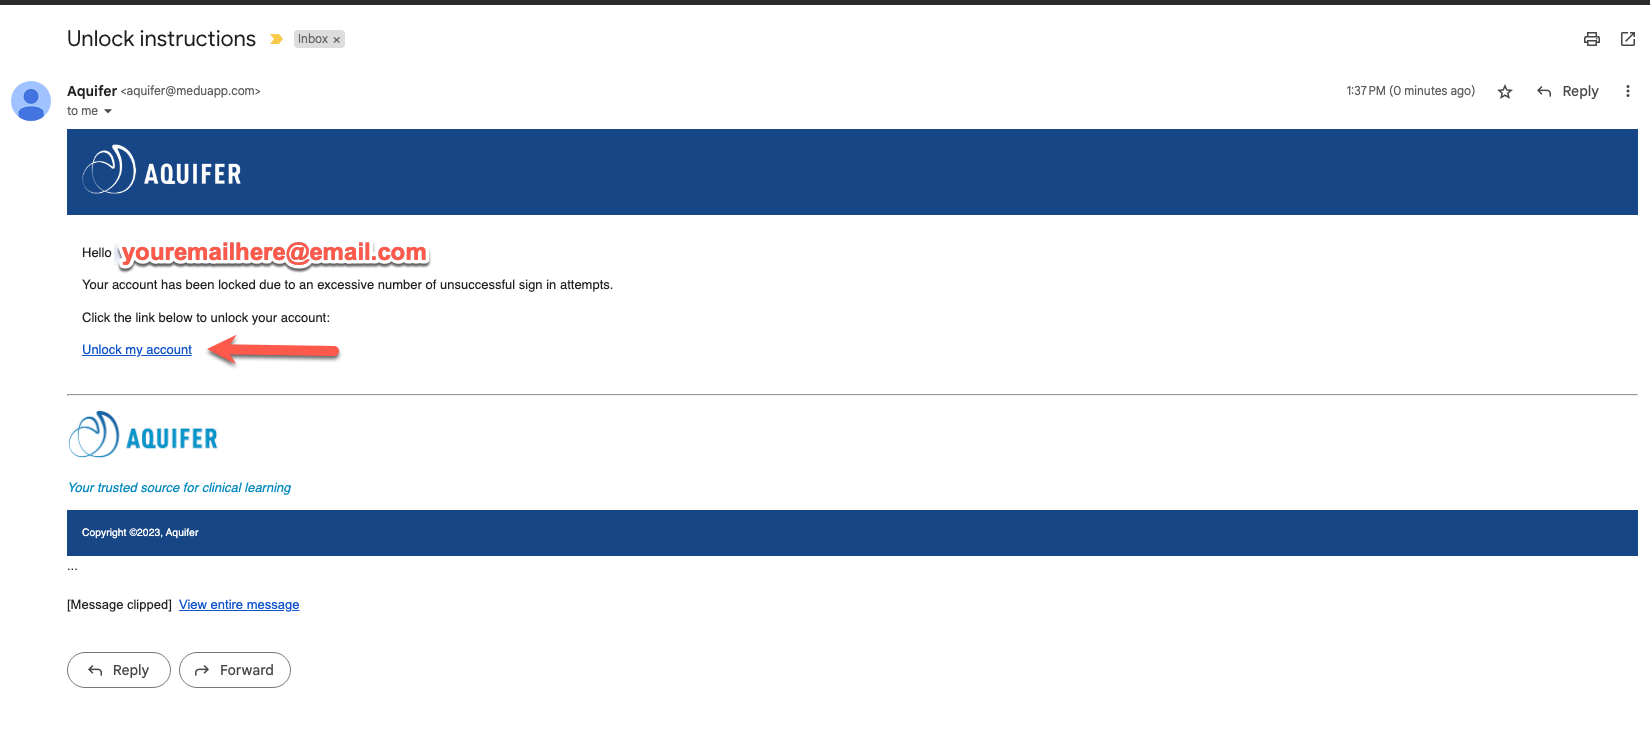
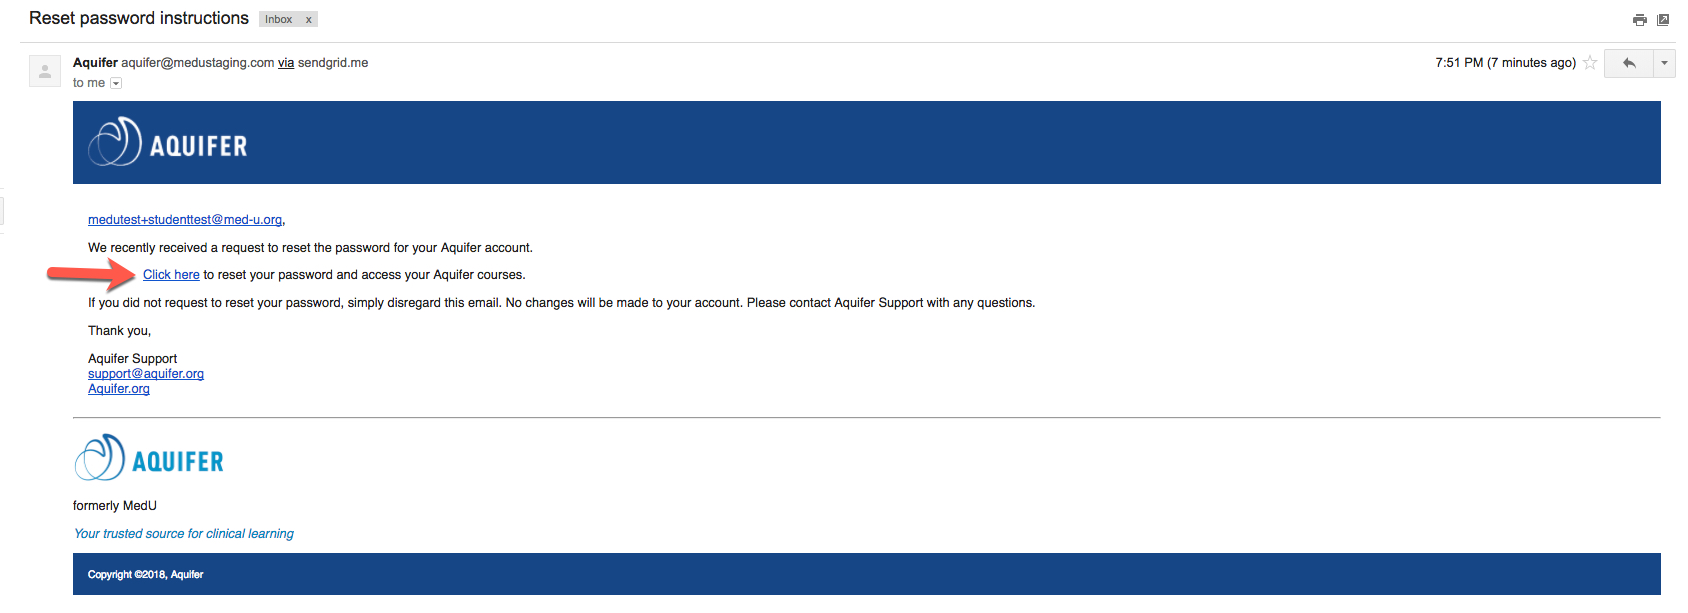
3. You will receive an email with instructions to reset your password. If you do not see this email, check your spam mailbox. Follow the instructions in the email to reset your password. Click the link to reset your password.


4. You will then be brought to a page where you can reset your password. Please put in your new password twice to confirm and click on “Change my password”. You will then be logged in with your new password.

Enter New Password