The Aquifer Searchable Content Library, accessible for all administrative users, provides advanced content search across all cases and Integrated Illness Scripts included in your subscription. The detailed content list displays key information—including synopses, case summaries, learning objectives, and Integrated Illness Script Mechanism of Disease Maps —with one click to help you choose content that fits your needs.
Content Library: Filter and Keyword Search Options
The searchable content library includes a series of dropdown filters. Use one or several filters to find exactly the content you need:
- Clinical Discipline
- Body System
- Patient Age
- Location Clinical Focus
- Quifer Content
- Condition/Diagnoses
- All Conditions and Diagnoses
- Presenting Problem
- Final Diagnosis
- Other Diagnoses Taught

- Basic Sciences
- Basic Science Disciplines
- Sciences Course Concepts

- Clinical Excellence Curricular Threads
-
-
- Clinical Excellence
- Clinical Principles
-

Detailed Case List Display
The detailed content list display will include the Aquifer cases and Integrated Illness Scripts, which meet your search criteria and are available through your program’s subscription.
From the display list, you can quickly view more information about the content to determine if it fits your needs. For cases, you can scan the case synopsis, learning objectives, and detailed case summaries available to students on completion of the case. You can scan the synopses and Mechanism of Disease Maps for Integrated Illness Scripts for each script.

Aquifer cases and integrated illness scripts are authored and continuously updated by the expert healthcare educators who make up the Aquifer Consortium. Content authors and the date the content was last updated are now displayed for each item—so you can be sure your students are being provided up-to-date content written by your trusted peers.
You can also access all cases and scripts directly from this page by clicking on the title. Unlike students, as an administrative user you will have ungated access to the cases, so that you can access all content at once without answering questions as you advance.
Using the Searchable Content Library to Build a Custom Course
Once you have selected the content you need, you can create a custom course directly from the Content Library page. You can choose content to assign to students to prepare for or review key clinical situations or concepts.
Click on Content Library in the side navigation or the Create Course button on your course navigation page to access the Content Library page.


Use the searchable Content Library filters to select the cases and integrated illness scripts you want to add to your custom course. Note: Skip this step if you want to create the custom course shell first and add cases later or create an exam roster.
After adding your content, click “View Selected Items” to verify you have selected the cases and scripts that suit your course.


- Click Create Custom Course.
- A pop-up message will confirm that you want to create a custom course from the selected cases. Click OK to continue.
- On the New Course page, enter the following:
- Course Name: We suggest using a consistent naming convention that includes course and rotation names, such as “Family Medicine Clerkship: Block 4”.
- Description: We suggest including the instructor’s name, instructions for the course, which cases are assigned, the due date, and anything else your students need to know.
- Person Responsible: Select the user responsible for the course from your list of eligible administrators. The person responsible will be visible on the course page to all students and administrators associated with the course and will be notified when it reaches its end date to either delete or extend the course date.
- Start Date: Visible to all course users.
- End Date: This date will show on the courses page for all associated users. When the end date is reached, the person responsible for the course will be notified and asked to delete or extend the date for this course.
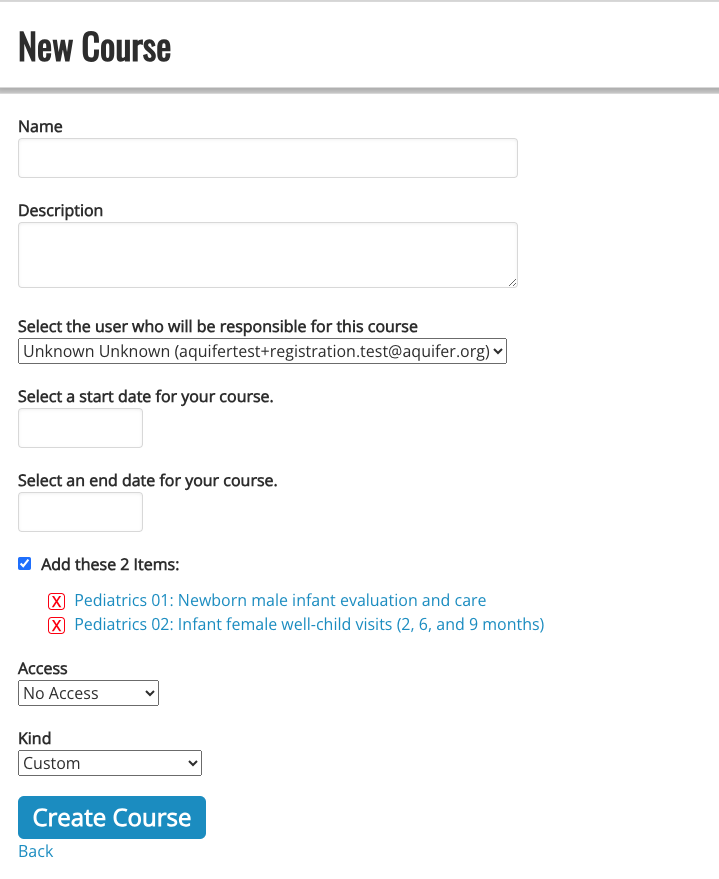 Click Create Course.
- You will then see a notification of successful course creation. On your new course page, you will see your course information at the top and the content you have selected shown below it.
Course creators can edit, duplicate, or delete Custom Courses with the click of a button.
